Thursday, June 28, 2012

Configure OnCommand DFM to discover NetApp filer in different subnet

This is a requirement when you install OnCommand DFM server in the management network and you need to discover the NetApp filer through the different network like NFS network.

If you have the Management IP configured for the NetApp, DFM will discover the Filer through the management network. If you have vFiler configured in a different network (Vlan) , the DFM wont discover the vFiler.

This is also a requirement for the VSC when installed on the OnCommand server. VSC will show all the filers and vFilers in the monitoring and host configuration through the management IP address but the vFiler will fail to discover in the backup and recovery section as a result you wont be able to do any backup on the datastore presented through the vfiler

To overcome this, you need to configure DFM server with 2 interfaces, one in the managemet and other one in the NFS ( in my case). The DFM server is a VM in my case.

By default DFM discover appliance in the same subnet, to discover appliance in the different subnet you need to do the following:

( 192.168.15.x is my management and 192.168.90.x is my storage network)

1) Create an SNMP in the subnet

# dfm snmp add -m 24 -v 1 -c public 192.169.90.200

where 192.168.90.200 is the ip address of the netapp filer on a different vlan

2) Check whether the host is added through the management IP address

# dfm host list

4) If the host is not added add the host


# dfm host add
 # dfm host list

5) now you can see the host added through the management interface, if you do a host diag you can see it wont work for 90 network

# dfm host diag 192.168.15.200
#dfm host diag 192.168.90.200

6) Now you have to change the appliance primary path

# dfm host set < hostname>  hostPrimaryAddress=192.168.90.200
# dfm host diag 192.168.90.200

You can see any vfiler on the NetApp controller also detected.

Thanks for reading...Jibby


Thursday, December 29, 2011

Flexpod components images

I got an opportunity to work on a Flexpod project. I took some pictures of each of the components and thought of put it here.

As you know the components are:
NetApp controller
Cisco UCS chassis with blades and fabric extender
Cisco Fabric interconnect
Cisco Nexus Switches

Below is the NetApp FAS 3240 with dual port 10G module which will be connected to the Nexus switch.
The cable used is fibre.


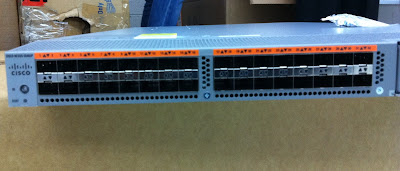
Below is the image of Nexus 5548up. This is the latest nexus switch in the 5500 platform where the "up" stands for unified port, which means each of the 32 fixed SFP ports can be individually configured for 1G,10G,10G with FCOE and with native fibre channel 1,2,4,8G line speed.


Below are the images of the Cisco Fabric interconnect , Cisco UCS 6120XP. This is a 1 RU fabric interconnect with 20 fixed ports with 10G Ethernet and FCOE SFP+   and 1 expansion slot.This supports up to 160 blade servers and 20 chassis in single domain. Cisco UCS manager is a software which is embedded with it.

There will be 2*6120XP interconnect which works as a cluster. One is primary and other is subordinate


Now the UCS chassis with blades and fabric extender. This is Cisco 5108 chassis with 8 hot swap fans, 4 power connections and 2 fabric extenders each with 10G ports.

Rear side of the chassis:


Front side of the Chassis with empty slots for blade:


Fabric extender with 4*10G FCOE connection. We used twinax cable to connect to Fabric interconnect


Cisco UCS blades, these are half width blades. 5100 chassis holds upto 4 full width blades and 8 half width blades. This is B230 blades. You can see 64GB SSD drives at the bottom of the blade.


The label on the B230 blade:


Blades with 2*SSD drives


Fully populated blade, inside view

32 memory slots and 2 cpu's all fully populated with 8GB memory stick


Chassis with blades 6*B230 blades. Total of 8 blades can be inserted.


I will post the Flexpod configuration and connectivity in the next post


Thursday, October 6, 2011

Installation of Solaris 10 Update 10 virtual machine on some versions of ESX might fail

Solaris Installation fails with kernel panic. This is because the of the memory size. Increase the memory size to 1.5GB.

Please refer Vmware kb 2007354.

http://kb.vmware.com/selfservice/microsites/search.do?language=en_US&cmd=displayKC&externalId=2007354


Thursday, November 18, 2010

Nexus 5020 VPC configuration with Netapp LACP VIF

I was playing around with nexus 5020 for a while. I was setting up Netapp FAS3020 with LACP VIF and creating a VPC on the nexus ( 4 links from filer and 2 links to each nexus). I failed to make the port channel up when I configured the port channel and ethernet port as trunk port and LACP mode active .The port channel is down with status  No operational members.

The filer is able to communicate if I configured LACP mode as on and port channel and ethernet port as trunk, but this is not I want. I want the LACP to be active mode.

So I configured the port channel and ethernet as access and allowed a specific vlan and configured the LACP as active. Here is how I set it up

1) Enable VPC  and LACP feature on the switch ( both the switch)

NX-1#feature vpc
NX-1#feature lacp

NX-1# show system internal clis feature
 4 lacp                           enabled
 9 vpc                            enabled

2) Create a vpc domain on all the nexus switch. The domain id should be same. Then configure the destination peer ( mgt Ip address of the other switch) this should be done on both the switches

NX-1(config-if)# vpc domain 5
NX-1(config-vpc-domain)#peer-keepalive destination 172.25.1.xx  ( This is the mgt IP address of NX-2)

 3) At this point if you check the vpc status, it will show as peer-link not configured, so we have to configured the peer link
NX-1(config)# sh vpc
Legend:
                (*) - local vPC is down, forwarding via vPC peer-link

vPC domain id                   : Not configured
Peer status                     : peer link not configured
vPC keep-alive status           : Disabled
Configuration consistency status: failed
Configuration consistency reason: vPC peer-link does not exists
vPC role                        : none established
Number of vPCs configured       : 0
Peer Gateway                    : Disabled
Dual-active excluded VLANs      : -


4) Configure the peer-link. This is the link which connect both the nexus, Since i have only 1 link , i'm configuring only one link, recommended is 2 peer link between nexus. Here my peer link is eth 1/37. This link is used for high speed communication between nexus. The channel group is 100

NX-1(config)# int Ethernet1/37
NX-1(config)# switchport mode trunk
NX-1(config-if)# channel-group 100 mode active
NX-1(config-if)# interface po100
NX-1(config-if)# vpc peer-link

NX-1(config-if)# sh vpc

Legend:
                (*) - local vPC is down, forwarding via vPC peer-link

vPC domain id                   : 5
Peer status                     : peer adjacency formed ok
vPC keep-alive status           : peer is alive

Configuration consistency status: success
vPC role                        : primary
Number of vPCs configured       : 0
Peer Gateway                    : Disabled
Dual-active excluded VLANs      : -

vPC Peer-link status
---------------------------------------------------------------------
id   Port   Status Active vlans
--   ----   ------ --------------------------------------------------
1    Po100  up     1,51,53,105,112,117,252,521,777,820,940


5) Creating a port-channel 10 and assigning to vpc10 ( on both nexus). This port channel is of type access and allows vlan 53 which is my SAN vlan.

NX-2(config)# interface port-channel 10
NX-2(config-if)# vpc 10
NX-2(config-if)# switchport mode access
NX-2(config-if)# switchport access vlan 53
NX-2(config-if)# exit

6) Assigning ports to the port channel 10 ( on both nexus). I have 2 ports on each nexus and adding those ports to the port channel 10

NX-1(config)# int eth 1/1
NX-1(config-if)# switchport mode access
NX-2(config-if)# switchport access vlan 53
NX-1(config-if)# channel-group 10 mode active
NX-2(config-if)# exit

NX-1(config)# int eth 1/2
NX-1(config-if)# switchport mode access
NX-2(config-if)# switchport access vlan 53
NX-1(config-if)# channel-group 10 mode active
NX-2(config-if)# exit

7)  Check the lacp port channel status. The port channel should be up. if not delete the LACP VIF from the Netapp filer and recreate again at this point. On the Netapp side you should choose LACP

NX-1(config)# sh lacp port-channel

port-channel10
  System Mac=0-5-9b-7d-d-7c
  Local System Identifier=0x9c4,0-5-9b-7d-d-7c
  Admin key=0x800a
  Operational key=0x800a
  Partner System Identifier=0x1,2-a0-98-9-74-ab
  Operational key=0x1
  Max delay=0
  VPC ID=10
  Aggregate or individual=1
  Member Port List=1-2


8) Check for the VPC status

NX-1(config)# sh vpc

vPC status
----------------------------------------------------------------------------
id     Port        Status Consistency Reason                     Active vlans
------ ----------- ------ ----------- -------------------------- -----------
10     Po10        up     success     success                    53


9) Check for the last part of sh int brief comand

NX-1(config)# sh int brief

--trunkated----


Port-channel VLAN  Type Mode   Status  Reason                    Speed  Protocol
Interface
--------------------------------------------------------------------------------
Po10         53    eth  access up      none                      a-1000(D)  lacp
Po100        1     eth  trunk  up      none                       a-10G(D)  lacp


This is how I setup the port channel with Netapp LACP VIF. I'm not a network expert so if you found any mistake or alternative ways to enable the port channel as trunk please let me know.

If you find this useful, dont forget to leave a comment ....Happy to hear that I'm helping someone out there..


Jibby George

Sunday, November 7, 2010

Last mile excellence

So  I'm all set to leave Kuwait. I was here for last 3.3 years and I have learned a lot. The biggest benefit I gained from here is the vmware. I consider this as a great achievement in my life as it takes months and years to master a new technology. I also sharpen my skills with Sun and Netapp.

 I was reading about this last mile excellence in Robin Sharma's article. I've seen most of the people once they resigned from the job , they tend to be lazy and hardly work because they don't have anything to gain or may be they don't care anymore. I was thinking how can I sign off with excellence from my employer. I was going through all my setup and check whether they need changes, patches, firmwares, make recommendation for future and so on. I helped my client to virtualised their data center with vmware vSphere and OVM(Ldoms) and implementation of FCoE over CNA cards and Nexus.

I got a chance to work with Nexus 5020 and my CCNA skills came handy here. I'm still trying to be the best and I want to sign-off with excellence.

Jibby

Thursday, September 16, 2010

Solaris 10 live upgrade to Solaris10 09/10 (update 9)

Solaris 10 09/10 (update 9) is the latest release of solaris. This release includes auto registration feature.
This feature needs to be disable before booting the server if you indent not to register the system.

While upgrading with luupgrade , registration can be disabled with -k keyword., where filename is a text file contain the keyword " auto_reg=disable " with out quotes.

On a Solaris 10 u9 system , regadm status shows like this after its disabled.

root# regadm status
Solaris Auto-Registration is currently disabled


Well the -k key is not included with the previous release of SUNWlucfg, so I installed it from the U9 dvd image.

1) Download the Solaris 10_u9 zip file and unzip it to the ISO image. Copy the file to the sun server.

2) lofi mount the ISO image

# lofiadm -a /export/home/jibby/sol-10-u9-ga-sparc-dvd.iso /dev/lofi/1

# mount -F hsfs -o ro /dev/lofi/1 /mnt

4) Remove the package and install the latest package from the dvd image , this needs to be done  else the -k   keyword wont work

# pkgrm SUNWlucfg SUNWluu SUNWlur
# cd /mnt/Solaris_10/Tools/Installers
# ./liveupgrade20 -noconsole - nodisplay

# pkgchk -v SUNWlucfg SUNWlur SUNWluu

Current root file system is on c0t0d0s0 (solenv1) and I'm copying it to the second disk c0t1d0s0 (solenv2)
I've a seprate /var FS , which I need to combine with / file system.
I've a /zone mounted for zones , which I'm not merging , instead using as a shared FS.
I've one zone installed called neo.

5) Creating a BE with name solenv2 and naming the current BE as solenv1, the merged keyword is used to indicate that we are merging it with the parent FS.

root# lucreate -c solenv1 -m /:/dev/dsk/c0t1d0s0:ufs -m /var:merged:ufs -n solenv2


6) Upgrade the BE solenv2 with latest release by pointing it to the DVD image.

root# luupgrade -u -k /path/reg_file -n solenv2 -s /mnt/

7) Check the status with lustatus

root# lustatus

Boot Environment           Is       Active Active          Can    Copy
Name                       Complete Now    On Reboot Delete Status
-------------------------- -------- ------ --------- ------ ----------
solenv1                           yes       yes          yes           no          -
solenv2                           yes         no            no          yes        -

8) Activate the BE solenv2.

root# luactivate solenv2


root# lustatus

Boot Environment           Is       Active Active    Can    Copy
Name                       Complete Now    On Reboot Delete Status
-------------------------- -------- ------ --------- ------ ----------
solenv1                    yes      no     no        yes    -
solenv2                    yes      yes    yes       no     -


9) Reboot the system with init 6

root# init 6 ( dont use reboot)

10) The machine boots into the disk slice c0t1d0s0 and you can see the /var merged within the root FS. The release version shows the latest version, the zone neo is also upgraded to the latest release.

root# cat /etc/release
                   Oracle Solaris 10 9/10 s10s_u9wos_14a SPARC
     Copyright (c) 2010, Oracle and/or its affiliates. All rights reserved.
                            Assembled 11 August 2010
ahaa..just now I noticed , Oracle Solaris :)

11) Once confirmed everything is fine you can delete the solenv1

root# ludelete solenv1

Determining the devices to be marked free.
Updating boot environment configuration database.
Updating boot environment description database on all BEs.
Updating all boot environment configuration databases.
Boot environment deleted.

root# lustatus


Boot Environment           Is       Active Active          Can     Copy
Name                       Complete Now    On Reboot  Delete Status
-------------------------- -------- ------ --------- ------ ----------
solenv2                           yes       yes           yes          no        -

So thats it , we are upgraded to the latest release. I never copied swap filesystem. you can specify seprate swap FS.
I did it with out proper planning and now I'm utilizing 2 disks. I realized i need everything on c0t0d0s0 and I want to merge /zones with the root filesystem., well start again , but this time no need to upgrade.

 root# lucreate -c solenv2 -m /:/dev/dsk/c0t0d0s0:ufs -m /zones:merged:ufs -n solenv1

root# lustatus

Boot Environment           Is       Active Active         Can     Copy
Name                       Complete Now    On Reboot Delete  Status
-------------------------- -------- ------ --------- ------ ----------
solenv2                          yes      yes        yes             no       -
solenv1                         yes      no          no              yes       -

root# luactivate solenv1

root# lustatus

Boot Environment           Is       Active   Active       Can    Copy
Name                       Complete Now    On Reboot Delete Status
-------------------------- -------- ------ --------- ------ ----------
solenv2                           yes      yes         no        no         -
solenv1                          yes      no           yes       no         -

 # init6

root# lustatus

Boot Environment           Is       Active Active    Can    Copy
Name                       Complete Now    On Reboot Delete Status
-------------------------- -------- ------ --------- ------ ----------
solenv2                    yes      no     no        yes    -
solenv1                    yes      yes    yes       no     -

# ludelete solenv2

Tuesday, September 7, 2010

ESXi 4.1- Windows 2008 server console. Poor mouse performance.

I provisioned a new Windows 2008 server and after installing  the vmware tools I found that the mouse performance was not optimal. This is due to the wrong graphics driver installed by the vmware tools. A solution for this is to install the correct graphics driver manually ( vmware SVGA 3D). the steps are as follows. You need a reboot, so plan it.

1) Right click on the desktop and select screen resolution or personalize/display settings) and choose advance settings link.


2) Choose the adapter tab, it will show the current adapter. Here it is VMware SVGA II , click on properties


3)  Select the driver tab and click the update driver tab  as shown in the figure.


4)  Click on browse my computer to install the driver software. the location of the driver is
c:/Program Files/Common Files/ VMware/Drivers/wddm_video


5)  Click Next , this will install the driver and display the next screen below. You need to reboot the computer to take effect.


Thats it , after reboot the mouse performance is optimal and I heard this issue is with window 7 too.