Thursday, November 18, 2010

Nexus 5020 VPC configuration with Netapp LACP VIF

I was playing around with nexus 5020 for a while. I was setting up Netapp FAS3020 with LACP VIF and creating a VPC on the nexus ( 4 links from filer and 2 links to each nexus). I failed to make the port channel up when I configured the port channel and ethernet port as trunk port and LACP mode active .The port channel is down with status  No operational members.

The filer is able to communicate if I configured LACP mode as on and port channel and ethernet port as trunk, but this is not I want. I want the LACP to be active mode.

So I configured the port channel and ethernet as access and allowed a specific vlan and configured the LACP as active. Here is how I set it up

1) Enable VPC  and LACP feature on the switch ( both the switch)

NX-1#feature vpc
NX-1#feature lacp

NX-1# show system internal clis feature
 4 lacp                           enabled
 9 vpc                            enabled

2) Create a vpc domain on all the nexus switch. The domain id should be same. Then configure the destination peer ( mgt Ip address of the other switch) this should be done on both the switches

NX-1(config-if)# vpc domain 5
NX-1(config-vpc-domain)#peer-keepalive destination 172.25.1.xx  ( This is the mgt IP address of NX-2)

 3) At this point if you check the vpc status, it will show as peer-link not configured, so we have to configured the peer link
NX-1(config)# sh vpc
Legend:
                (*) - local vPC is down, forwarding via vPC peer-link

vPC domain id                   : Not configured
Peer status                     : peer link not configured
vPC keep-alive status           : Disabled
Configuration consistency status: failed
Configuration consistency reason: vPC peer-link does not exists
vPC role                        : none established
Number of vPCs configured       : 0
Peer Gateway                    : Disabled
Dual-active excluded VLANs      : -


4) Configure the peer-link. This is the link which connect both the nexus, Since i have only 1 link , i'm configuring only one link, recommended is 2 peer link between nexus. Here my peer link is eth 1/37. This link is used for high speed communication between nexus. The channel group is 100

NX-1(config)# int Ethernet1/37
NX-1(config)# switchport mode trunk
NX-1(config-if)# channel-group 100 mode active
NX-1(config-if)# interface po100
NX-1(config-if)# vpc peer-link

NX-1(config-if)# sh vpc

Legend:
                (*) - local vPC is down, forwarding via vPC peer-link

vPC domain id                   : 5
Peer status                     : peer adjacency formed ok
vPC keep-alive status           : peer is alive

Configuration consistency status: success
vPC role                        : primary
Number of vPCs configured       : 0
Peer Gateway                    : Disabled
Dual-active excluded VLANs      : -

vPC Peer-link status
---------------------------------------------------------------------
id   Port   Status Active vlans
--   ----   ------ --------------------------------------------------
1    Po100  up     1,51,53,105,112,117,252,521,777,820,940


5) Creating a port-channel 10 and assigning to vpc10 ( on both nexus). This port channel is of type access and allows vlan 53 which is my SAN vlan.

NX-2(config)# interface port-channel 10
NX-2(config-if)# vpc 10
NX-2(config-if)# switchport mode access
NX-2(config-if)# switchport access vlan 53
NX-2(config-if)# exit

6) Assigning ports to the port channel 10 ( on both nexus). I have 2 ports on each nexus and adding those ports to the port channel 10

NX-1(config)# int eth 1/1
NX-1(config-if)# switchport mode access
NX-2(config-if)# switchport access vlan 53
NX-1(config-if)# channel-group 10 mode active
NX-2(config-if)# exit

NX-1(config)# int eth 1/2
NX-1(config-if)# switchport mode access
NX-2(config-if)# switchport access vlan 53
NX-1(config-if)# channel-group 10 mode active
NX-2(config-if)# exit

7)  Check the lacp port channel status. The port channel should be up. if not delete the LACP VIF from the Netapp filer and recreate again at this point. On the Netapp side you should choose LACP

NX-1(config)# sh lacp port-channel

port-channel10
  System Mac=0-5-9b-7d-d-7c
  Local System Identifier=0x9c4,0-5-9b-7d-d-7c
  Admin key=0x800a
  Operational key=0x800a
  Partner System Identifier=0x1,2-a0-98-9-74-ab
  Operational key=0x1
  Max delay=0
  VPC ID=10
  Aggregate or individual=1
  Member Port List=1-2


8) Check for the VPC status

NX-1(config)# sh vpc

vPC status
----------------------------------------------------------------------------
id     Port        Status Consistency Reason                     Active vlans
------ ----------- ------ ----------- -------------------------- -----------
10     Po10        up     success     success                    53


9) Check for the last part of sh int brief comand

NX-1(config)# sh int brief

--trunkated----


Port-channel VLAN  Type Mode   Status  Reason                    Speed  Protocol
Interface
--------------------------------------------------------------------------------
Po10         53    eth  access up      none                      a-1000(D)  lacp
Po100        1     eth  trunk  up      none                       a-10G(D)  lacp


This is how I setup the port channel with Netapp LACP VIF. I'm not a network expert so if you found any mistake or alternative ways to enable the port channel as trunk please let me know.

If you find this useful, dont forget to leave a comment ....Happy to hear that I'm helping someone out there..


Jibby George

Sunday, November 7, 2010

Last mile excellence

So  I'm all set to leave Kuwait. I was here for last 3.3 years and I have learned a lot. The biggest benefit I gained from here is the vmware. I consider this as a great achievement in my life as it takes months and years to master a new technology. I also sharpen my skills with Sun and Netapp.

 I was reading about this last mile excellence in Robin Sharma's article. I've seen most of the people once they resigned from the job , they tend to be lazy and hardly work because they don't have anything to gain or may be they don't care anymore. I was thinking how can I sign off with excellence from my employer. I was going through all my setup and check whether they need changes, patches, firmwares, make recommendation for future and so on. I helped my client to virtualised their data center with vmware vSphere and OVM(Ldoms) and implementation of FCoE over CNA cards and Nexus.

I got a chance to work with Nexus 5020 and my CCNA skills came handy here. I'm still trying to be the best and I want to sign-off with excellence.

Jibby

Thursday, September 16, 2010

Solaris 10 live upgrade to Solaris10 09/10 (update 9)

Solaris 10 09/10 (update 9) is the latest release of solaris. This release includes auto registration feature.
This feature needs to be disable before booting the server if you indent not to register the system.

While upgrading with luupgrade , registration can be disabled with -k keyword., where filename is a text file contain the keyword " auto_reg=disable " with out quotes.

On a Solaris 10 u9 system , regadm status shows like this after its disabled.

root# regadm status
Solaris Auto-Registration is currently disabled


Well the -k key is not included with the previous release of SUNWlucfg, so I installed it from the U9 dvd image.

1) Download the Solaris 10_u9 zip file and unzip it to the ISO image. Copy the file to the sun server.

2) lofi mount the ISO image

# lofiadm -a /export/home/jibby/sol-10-u9-ga-sparc-dvd.iso /dev/lofi/1

# mount -F hsfs -o ro /dev/lofi/1 /mnt

4) Remove the package and install the latest package from the dvd image , this needs to be done  else the -k   keyword wont work

# pkgrm SUNWlucfg SUNWluu SUNWlur
# cd /mnt/Solaris_10/Tools/Installers
# ./liveupgrade20 -noconsole - nodisplay

# pkgchk -v SUNWlucfg SUNWlur SUNWluu

Current root file system is on c0t0d0s0 (solenv1) and I'm copying it to the second disk c0t1d0s0 (solenv2)
I've a seprate /var FS , which I need to combine with / file system.
I've a /zone mounted for zones , which I'm not merging , instead using as a shared FS.
I've one zone installed called neo.

5) Creating a BE with name solenv2 and naming the current BE as solenv1, the merged keyword is used to indicate that we are merging it with the parent FS.

root# lucreate -c solenv1 -m /:/dev/dsk/c0t1d0s0:ufs -m /var:merged:ufs -n solenv2


6) Upgrade the BE solenv2 with latest release by pointing it to the DVD image.

root# luupgrade -u -k /path/reg_file -n solenv2 -s /mnt/

7) Check the status with lustatus

root# lustatus

Boot Environment           Is       Active Active          Can    Copy
Name                       Complete Now    On Reboot Delete Status
-------------------------- -------- ------ --------- ------ ----------
solenv1                           yes       yes          yes           no          -
solenv2                           yes         no            no          yes        -

8) Activate the BE solenv2.

root# luactivate solenv2


root# lustatus

Boot Environment           Is       Active Active    Can    Copy
Name                       Complete Now    On Reboot Delete Status
-------------------------- -------- ------ --------- ------ ----------
solenv1                    yes      no     no        yes    -
solenv2                    yes      yes    yes       no     -


9) Reboot the system with init 6

root# init 6 ( dont use reboot)

10) The machine boots into the disk slice c0t1d0s0 and you can see the /var merged within the root FS. The release version shows the latest version, the zone neo is also upgraded to the latest release.

root# cat /etc/release
                   Oracle Solaris 10 9/10 s10s_u9wos_14a SPARC
     Copyright (c) 2010, Oracle and/or its affiliates. All rights reserved.
                            Assembled 11 August 2010
ahaa..just now I noticed , Oracle Solaris :)

11) Once confirmed everything is fine you can delete the solenv1

root# ludelete solenv1

Determining the devices to be marked free.
Updating boot environment configuration database.
Updating boot environment description database on all BEs.
Updating all boot environment configuration databases.
Boot environment deleted.

root# lustatus


Boot Environment           Is       Active Active          Can     Copy
Name                       Complete Now    On Reboot  Delete Status
-------------------------- -------- ------ --------- ------ ----------
solenv2                           yes       yes           yes          no        -

So thats it , we are upgraded to the latest release. I never copied swap filesystem. you can specify seprate swap FS.
I did it with out proper planning and now I'm utilizing 2 disks. I realized i need everything on c0t0d0s0 and I want to merge /zones with the root filesystem., well start again , but this time no need to upgrade.

 root# lucreate -c solenv2 -m /:/dev/dsk/c0t0d0s0:ufs -m /zones:merged:ufs -n solenv1

root# lustatus

Boot Environment           Is       Active Active         Can     Copy
Name                       Complete Now    On Reboot Delete  Status
-------------------------- -------- ------ --------- ------ ----------
solenv2                          yes      yes        yes             no       -
solenv1                         yes      no          no              yes       -

root# luactivate solenv1

root# lustatus

Boot Environment           Is       Active   Active       Can    Copy
Name                       Complete Now    On Reboot Delete Status
-------------------------- -------- ------ --------- ------ ----------
solenv2                           yes      yes         no        no         -
solenv1                          yes      no           yes       no         -

 # init6

root# lustatus

Boot Environment           Is       Active Active    Can    Copy
Name                       Complete Now    On Reboot Delete Status
-------------------------- -------- ------ --------- ------ ----------
solenv2                    yes      no     no        yes    -
solenv1                    yes      yes    yes       no     -

# ludelete solenv2

Tuesday, September 7, 2010

ESXi 4.1- Windows 2008 server console. Poor mouse performance.

I provisioned a new Windows 2008 server and after installing  the vmware tools I found that the mouse performance was not optimal. This is due to the wrong graphics driver installed by the vmware tools. A solution for this is to install the correct graphics driver manually ( vmware SVGA 3D). the steps are as follows. You need a reboot, so plan it.

1) Right click on the desktop and select screen resolution or personalize/display settings) and choose advance settings link.


2) Choose the adapter tab, it will show the current adapter. Here it is VMware SVGA II , click on properties


3)  Select the driver tab and click the update driver tab  as shown in the figure.


4)  Click on browse my computer to install the driver software. the location of the driver is
c:/Program Files/Common Files/ VMware/Drivers/wddm_video


5)  Click Next , this will install the driver and display the next screen below. You need to reboot the computer to take effect.


Thats it , after reboot the mouse performance is optimal and I heard this issue is with window 7 too.

Tuesday, August 31, 2010

ESXi 4.1 Unable to install / upgrade VMware Tools on Guest OS

Recently I was trying to upgrade vmware tools on a windows 2008 guest and I got an error

"Unable to install VMware Tools. An error occurred while trying to access image file "/usr/lib/vmware/isoimages/windows.iso" needed to install VMware Tools: 2 (No such file or directory). If your product shipped with the VMware Tools package, reinstall VMware ESX, then try again to install the VMware Tools package in the virtual machine.   The required VMware Tools ISO image does not exist or is inaccessible."

Further investigation through remote tech support into the ESXi host I found that the iso image is missing from the directory and the directory is 100% full, which must be the reason for not installing the tool images. I found that old tool images are not removed from the system and as a result while upgrading , its not able to copy the new images due to file system full.

I guess this issue is due to a upgrade from esxi4 u1 to esxi4.1. Somehow the upgrade didnt went well or some other issue. But the ESXi server is up and running and hosting more than 100 vms. I dont want to reinstall the ESXi on the host. ESXi 4.1 comes with resmote tech support , no need to go through unsupported way anymore

I fix the issue by copying the image file from a working ESXi4.1 server.

1) Start the remote tech support (SSH), Click on the ESXi host on the left panel, go to configuration ,
on the software section click on Security profile, Click properties on the right top corner, click remote
tech support and click option and start the ssh.


2) Use putty to ssh into the ESXi host and delete the old images files from the below location

/vmfs/volumes/e00f98e1-2bcc0c91-e7a2-3487611c1557/packages/4.0.0/vmtools

3) Using winscp to copy files to the ESXi host location, provided you already copy the image files from a working ESXi 4.1 server to the laptop/desktop. Copy to below location:

/vmfs/volumes/e00f98e1-2bcc0c91-e7a2-3487611c1557/packages/4.1.0/vmtools.

4) Copy the  .iso, .sig and tools-key.pub. files, because all these files required if you want to upgrade the vmware tools.

Thats its close the winscp, putty and Dont forget to stop the remore tech support(SSH). Now right click on the VM ->guest -> Install/upgrade  vmware tools.


There is another way where you can copy the iso image (windows.iso) to the local datastore and mount the iso image and start the installation. This you have to mount and umount the iso image each time for every VMs. If you have only few VMs this will be easy way but tedious for 100 VMs.

Wednesday, August 4, 2010

Unable to obtain hardware information for the selected machine - vCenter converter error

I was moving an RHEL6 64 bit VM to another host through vCenter converted standalone 4.0.1 build 161434 and I got the following error " Unable to obtain hardware information for the selected machine " .


I figure it out that the issue is due to the Guest Operating System version. RHEL 6 version is not supported with vConverter. The workaround is to edit the vm settings, change the GOS version to RHEL5  and move the machine. Once its moved , before powering on, change the version back to original version.

Sunday, August 1, 2010

How to remove Netapp VSC 1.0 plugin / uninstalling VSC 1.0 plugin

I was installing Netapp VSC 2.0 (Virtual Storage Console) on my vCenter server, while installing it asked me to uninstall the old version of VSC and RCU from the vCenter server. I went to the control panel and uninstall the program manually. After uninstalling VSC, I found that the plug-in is not removed. (vSphere client-manage plug-in) see the snapshot below


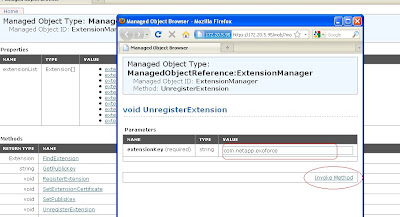
I dont know why its not removed, I found a way to remove the plug-in through Managed object browser.
1) Go to the browser and type the address of your vCenter server like below and it will open the mob window for you. Once the window is open , on the properties table click on the content
     https://vcenterserver/mob


( Click on the content link)


2) Next window on the properties table  click on the Extension Manager


3) On the next screen , properties table, check for the netapp extension (com.netapp.exoforce)


4) Click on the extension list and look at the properties table and copy the key string ( com.netapp.exoforce)


5) Once copied the string , go back on the browser window(previous page) and look for unregister Extension on the Methods table.


6) On the next screen , paste the copied string and click invoke Method , you will get the status as " Method Invocation Result: void ".


7) Thats it , close the window and log into vSphere Client. If you already logged in , log out and log back


The plug-in is removed and now you can proceed to install the VSC 2.0. This not a mandatory for installing VSC 2.0, but I like the plug-in manager to look clean. that's why..