Wednesday, August 4, 2010

Unable to obtain hardware information for the selected machine - vCenter converter error

I was moving an RHEL6 64 bit VM to another host through vCenter converted standalone 4.0.1 build 161434 and I got the following error " Unable to obtain hardware information for the selected machine " .


I figure it out that the issue is due to the Guest Operating System version. RHEL 6 version is not supported with vConverter. The workaround is to edit the vm settings, change the GOS version to RHEL5  and move the machine. Once its moved , before powering on, change the version back to original version.

Sunday, August 1, 2010

How to remove Netapp VSC 1.0 plugin / uninstalling VSC 1.0 plugin

I was installing Netapp VSC 2.0 (Virtual Storage Console) on my vCenter server, while installing it asked me to uninstall the old version of VSC and RCU from the vCenter server. I went to the control panel and uninstall the program manually. After uninstalling VSC, I found that the plug-in is not removed. (vSphere client-manage plug-in) see the snapshot below


I dont know why its not removed, I found a way to remove the plug-in through Managed object browser.
1) Go to the browser and type the address of your vCenter server like below and it will open the mob window for you. Once the window is open , on the properties table click on the content
     https://vcenterserver/mob


( Click on the content link)


2) Next window on the properties table  click on the Extension Manager


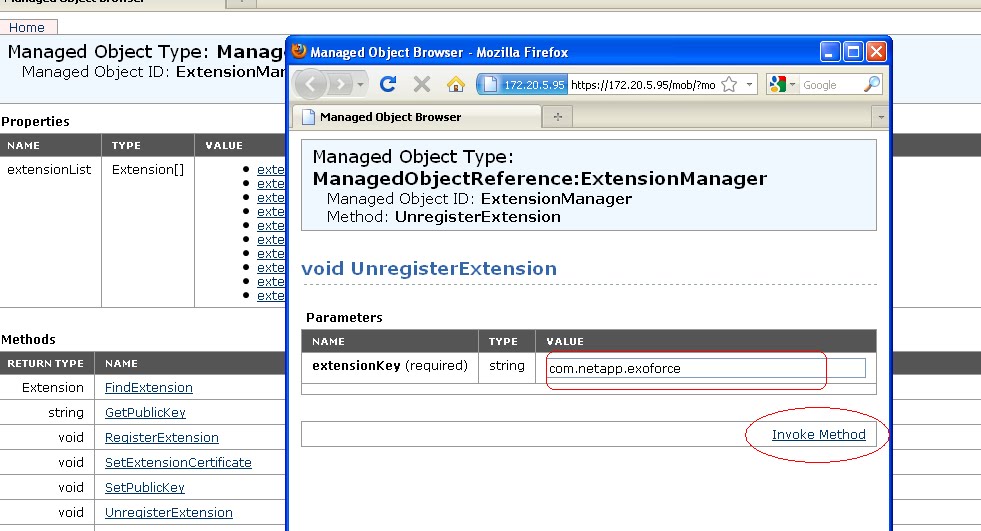
3) On the next screen , properties table, check for the netapp extension (com.netapp.exoforce)


4) Click on the extension list and look at the properties table and copy the key string ( com.netapp.exoforce)


5) Once copied the string , go back on the browser window(previous page) and look for unregister Extension on the Methods table.


6) On the next screen , paste the copied string and click invoke Method , you will get the status as " Method Invocation Result: void ".


7) Thats it , close the window and log into vSphere Client. If you already logged in , log out and log back


The plug-in is removed and now you can proceed to install the VSC 2.0. This not a mandatory for installing VSC 2.0, but I like the plug-in manager to look clean. that's why..

Thursday, July 15, 2010

Upgrading to ESXi 4.1 with vihostupdate Utility

 vihostupdate Utility
If you have a standalone ESXi host, upgrading to 4.1 is very simple. If your hosts are connected through vCenter, then you need to upgrade vCenter server first.

Note that you cannot upgrade your host through the following methods

  • VMware vCenter Update Manager. vSphere module that supports direct upgrades from ESX 3.5 and ESX 4.0 to ESX 4.1.
  • vihostupdate. Command-line utility that supports direct upgrades from ESX/ESXi 4.0 to ESX/ESXi 4.1. This utility requires the vSphere CLI.
  • esxupdate. Command-line utility for ESX 4.0 to ESX 4.1
  • esxupgrade.sh script. For ESX 3.5 hosts that do not have network access. 
Only the first 2 methods can be used to upgrade the ESXi hosts. Here I used the vihostupdate Utility.

Procedure is as follows, here I installed through vihostupdate.
1) Download the zip file from the vmware site (upgrade-from-ESXi4.0-to-4.1.0-0.0.260247-release.zip)
2) Keep the file in the local PC or laptop where vSphere CLI is installed. ( I placed on F drive)
3) Put the host in maintenance mode.
4) Invoke the vSphere CLI and update the hosts through below command

The upgrade ZIP bundle contains and esxupdate bulletin and an upgrade bulletin.
Install the esxupdate bulletin first by the command

C:\Program Files\VMware\VMware vSphere CLI\bin>vihostupdate.pl --server vm4 --install --bundle F:\upgrade-from-ESXi4.0-to-4.1.0-0.0.260247-release.zip -B ESXi410-GA-esxupdate


Then Install the upgrade bulletin by the command:

C:\Program Files\VMware\VMware vSphere CLI\bin>vihostupdate.pl --server vm4 --install --bundle F:\upgrade-from-ESXi4.0-to-4.1.0-0.0.260247-release.zip -B ESXi410-GA

 
Enter username: root
Enter password:


Please wait patch installation is in progress ...
The update completed successfully, but the system needs to be rebooted for the changes to be effective.
C:\Program Files\VMware\VMware vSphere CLI\bin>

5) Reboot the host and exit maintenance mode.

C:\Program Files\VMware\VMware vSphere CLI\bin>vihostupdate.pl --server vm4 -q
Enter username: root
Enter password:
---------Bulletin ID--------- -----Installed----- ----------------Summary-----------------
ESXi410-GA                           T03:55:16          ESXi upgrade Bulletin
ESXi410-GA-esxupdate          T07:29:43          ESXi pre-upgrade Bulletin


Tuesday, July 6, 2010

ESXi, Installing the CNA card for 10GBE and FCoE

Last week I installed the Q-logic CNA card on the ESXi server through vSphere CLI. It was a Live production machine.
1) Migrated all the VMs to the other machine on the cluster and put the ESXi on maintenance mode.
2) Then shutdown the machine and install the CNA adapter.
3) Power-on the server and it came back to maintenance mode.
4) Download the driver for 10GB Ethernet and FCoE from the Q-logic site ( it will re-direct to vmware site).    
(we need 2 drivers here, one for Ethernet and another for FCOE. The drivers are in ISO format.)
5) Burn the driver to the cd or use an ISO mounter on your Laptop/PC where the vSphere CLI is installed. ( here I mounted on drive H)
6) Start-Program-vmware-vSphere CLI, launch the CLI and install the driver by below command

C:\Program Files\VMware\VMware vSphere CLI\bin> vihostupdate.pl --server vm3 --install --bundle H:\offline-bundle\qlgc-qlge-100.2.1-offline_bundle-261179.zip
Enter username: root
Enter password:
Please wait patch installation is in progress ...
The update completed successfully, but the system needs to be rebooted for the changes to be effective.


7) Install the driver for FCoE (qlg.831.k1.23vmw-offline_bundle-207277.zip) also the same way. reboot the server and it will be back to maintenance mode
Check the adapter by click on configuration-network adapters.


Saturday, June 19, 2010

Enabling Jumbo frames on ESXi through vSphere CLI

If you want to enable jumbo frames or install drivers use the CLI option. Dont enable SSH and go to the unsupported console.

Download and install vSphere CLI on the desktop or on the laptop you used to manage the ESXi servers.

Once installed , go to Start - programs - vmware- vSphere CLI. This will open the command prompt and cd to bin directory. dir will list all the commands for you

C:\Program Files\VMware\VMware vSphere CLI\bin>

1) the below command will list all the switches and MTU size

C:\Program Files\VMware\VMware vSphere CLI\bin> vicfg-vswitch.pl --server vm4 -l

Enter username: root
Enter password:
Switch Name     Num Ports       Used Ports      Configured Ports    MTU     Uplinks
vSwitch1                 64                      1                  64                     1500

2) Run the below command to change the MTU size of the vswitch1

C:\Program Files\VMware\VMware vSphere CLI\bin> vicfg-vswitch.pl --server vm4 -m 9000 vSwitch1

3) To list the changes , run the command

C:\Program Files\VMware\VMware vSphere CLI\bin> vicfg-vswitch.pl --server vm4 -l
Enter username: root
Enter password:
Switch Name     Num Ports       Used Ports      Configured Ports    MTU     Uplinks
vSwitch1                     64                  1                   64                     9000

4) The below command will list the MTU of the vmnic 

C:\Program Files\VMware\VMware vSphere CLI\bin> esxcfg-nics.pl -server vm4 -l

Hope this helps someone. You can do this through vSphere CLI,or  vMA. But don't do this in unsupported way by enabling SSH.
-------------------------------------------------------------------------------------------

ESXi - Enabling SSH and Jumbo frames.

Enabling Jumbo frames on the ESXi server took me some time as most people suggest me to enable SSH and the login to the unsupported console and enable the jumbo frames. This is not supported by vmware. If you have a evaluation version running on a test machine you can try this.
We decided to go with ESXi installation on our Sun servers and HP servers and we enabled Jumbo frames on the switches and the Netapp storages. We enable on the real production machine through vSphere CLI.  I will write about that in next session.

1) Enable SSH on the ESXi hosts
  a) Go to the console of the ESXi host and press ALt+F1
  b) Type "unsupported" on the window, this text wont be echoed.
  c) Enter the root password, you will get the prompt ~ #
  d) Edit the file /etc/inetd.conf
         ~ # vi /etc/inetd.conf
  e) Remove the # from the line ssh.
   ssh     stream  tcp     nowait  root    /sbin/dropbearmulti     dropbear  ++min=0,swap,group=shell -i -K60

  f) Determine the process id of inetd from the command
           ~ # ps | grep inetd
  g) Restart the inetd
           ~ # kill -HUP

2) Enabling Jumbo frames

  a) Login to the server using SSH
  b) esxcfg-vswitch -l  , This will lists the current vswitches including the MTU sizes

~ # esxcfg-vswitch -l

Switch Name    Num Ports   Used Ports  Configured Ports  MTU     Uplinks
vSwitch0       64          3           64                1500    vmnic2

  PortGroup Name      VLAN ID  Used Ports  Uplinks
  VM Network          0        0           vmnic2
  Management Network  0        1           vmnic2

  c) Set the Jumbo frames for the vswitch0

     ~# esxcfg-vswitch -m 9000 vSwitch0

  d) Check the changes
  
~ # esxcfg-vswitch -l
 
Switch Name    Num Ports   Used Ports  Configured Ports  MTU     Uplinks
vSwitch0       64          3           64                9000    vmnic2

  PortGroup Name      VLAN ID  Used Ports  Uplinks
  VM Network          0        0           vmnic2
  Management Network  0        1           vmnic2


  e) Verify that that the NIC has the new value

     ~ # esxcfg-nics -l

      vmnic2  41:00.00 bnx2        Up   1000Mbps  Full   18:a9:05:68:cd:d0 9000

Enabling Jumbo frames on nxge interface or on T5140 server

To enable jumbo frames on the nxge interface you need to edit the below file. There is option to enable frames per interface, but this didnt work out for me so I enable on all the interface.

/platform/sun4v/kernel/drv/nxge.conf

#------- Jumbo frame support ---------------------------------
# To enable jumbo support for all nxge interfaces,
 accept_jumbo = 1;
#
# To disable jumbo support for all nxge interfaces,
# accept_jumbo = 0;
#
# Default is 0.  See the example at the end of this file for
# enabling or disabling jumbo for a particular nxge interface.
#
#

root@husky # dladm show-link
nxge0           type: non-vlan  mtu: 9194       device: nxge0
nxge1           type: non-vlan  mtu: 9194       device: nxge1
nxge2           type: non-vlan  mtu: 9194       device: nxge2
nxge3           type: non-vlan  mtu: 9194       device: nxge3